Like Lois Pearl

Monday, April 25, 2011

Whirlwind Easter

What a crazy weekend it was!

We started with one battered car, made it to 3 lovely Easter dinners with family, and ate countless pounds of chocolate.

Miss E Lo is loving her shiny new shoes and fun sun glasses!  Dress made by mommy of course, although my little fashionista chose her own fabric.

This weekend spent near family and dear friends was such a wonderful blessing.

Now I'm off to mend a bit and try to lose those chocolate pounds!


Sunday, April 24, 2011

Picnik!

Have you ever heard of Picnik

It allows me to turn this...


...into this.


And this...


...into this.


And this...


...into this.


The best part, it's free! 

I love Picnik!


Thursday, April 21, 2011

Embroidery Hoop Art

My crafty friend K featured this on her blog, Hanging on by a Thread, recently, and I knew I had to try it!  The best part, I had all the supplies just sitting in my crafty closet!


I decided to add this fun penant design to my first hoop.  I love that I was able to use several of my favorite prints from my ever-expanding scrap basket.

They make the perfect first-impression at the bottom of our basement stairs.  A nice little introduction into my crafty den, or the "sweat shop" as Hillbilly likes to call it!


Happy crafty!
e

And the winner is...

Sara K.!

Sara entered "A Whole Lot of Crafty".  After a bit of thought, my committee and I decided to tweak to
"A Whole Lot of Handmade"

Miss Sara, please email me and we'll get your new bag in the mail!

Thanks to everyone who entered for a chance to win my first giveaway.  I promise to host another very soon.

And just so I don't commit the cardinal sin of posting with no pics, here is a quick peekie of a custom order.


Love the ruffle and button!


Wednesday, April 20, 2011

Waiting...

The tagline has been chosen, but I'm waiting for my little bloggy facelift to be complete before the big reveal.  It should be sometime either today or tomorrow! 

Here's a little glimpse of what I've been working on while you wait.

Sorry for the crummy lighting.  Yesterday was just dark and rainy.  Mother Nature didn't realize that I needed to take some photos!

Pink satin and lots of sparkly pink tulle!  A special little girl is going to look like a princess this Easter Sunday!

I've been thinking about posting a "formal" line in the shop.  What do you think?

Happy crafty,
e

Monday, April 18, 2011

Saved by the Paint

Years ago, folks just used to dump their trash out in the country. Sadly, a portion of my parents farm was used as a small dump. When my brother and I were growing up, we loved going back there and hunting for treasures. When the kids and I took a hike this past week, we came across these bottles.


The glassese are so old, I couldn't quite get them clean enough inside, so I decided to give them a facelift. A few coats of spray-chalkboard paint, and we have a set of sweet new bud vases.


Happy crafty,
e

Sunday, April 17, 2011

A Little Contest....And Giveaway!

This spring weather has put me in the mood for makeovers lately.  It's time for a little facelift for the blog.  This is where I need your help!  My literary creative genes are stalled out.  So, here's the scoop.

I need of fun name for my blog!  It will still be titled Lois Pearl, but I need a "tagline" of sorts.  Something that encompasses what I like to share here.  Think cooking, etsy shopping, kiddos, a little bit of country, and whole lot of crafty. 

Now for the best part.  I'm asking you to help!  Leave comments here or on Facebook with your thoughts for a new blog name.  All ideas will be considered, and the one that is chosen will win a lovely springy prize!!


A terrific handbag that can be customized just for you!  It meaures 12" long by 12" tall, and features an adjustable strap.  I love this print!

So start brainstorming and share your ideas!

Thanks for helping!
e

All entries must be in by noon on Tuesday, April 19th.  The winner will be annouced Tuesday evening.

Friday, April 15, 2011

Totally Hoosier Etsy Finds

Happy Friday! 

I just wanted to share a few great etsy finds from this week!  They just scream INDIANA!


Love these pillows from lovecalifornia

Customizable Indiana State Pillow

And this Ball Jar Tee from twicetees

Firefly/ Black American Apparel/ Unisex Medium
Having grown up near the Ball headquarters in Muncie, I have a slight obsession with these lovely jars.

And of course, I love these notecards from springtidepress.

I like you sow much.

If you haven't discovered Etsy.com yet you need to!

Happy Friday,
e

Thursday, April 14, 2011

Girls Trip to the International Quilt Festival

When my mom asked me to attend the Quilt Festival with her last year in Chicago, I happily agreed to go along.  Visions of sweet little old ladies with snow white hair, shuffling around and fingering ancient quilts came to mind.  I knew that I would enjoy doing just about anything with my mom, but assumed there wouldn't be much for me to get into.

Ok, I was completely wrong!

Quilting is such an amazing art form.  The crafty revolution has brought on board a whole new generation of sewists who are trying their hand at quilting, or stitching in some other form. 

The International Quilt Festival is now an annual girls' outing for us.  This year we made it a day trip to Cinncinnati, OH.  It was a gorgeous day for a drive.  We attending on the last day of the show, and were able to totally avoid the crowds.


This is a shot of 1/2 of the show floor.

I took my camera along  hoping to snap up tons of pictures to share.  Turns out there are some pretty strict rules about photographing booths and quilts!  My mom was convinced that my Canon and I were going to get us kicked out of the show.

We were greeted in the main hall by this beautiful quilt.

"Crossing to Freedom"  Jane Burch Cochran

It's difficult to tell from the picture, but it is covered in a rainbow of buttons.  It was breathtaking!

There was such a huge variety too.  Many of the modern quilts look like paintings or portaits from far away. 

And then there were the antique quilts.

Note the tag on the side of this one.  It is 130 years old.


So. Many. Tiny.  Squares...


And I love to think that all of these little squares came from scraps of fabric used to make handsewn clothes.  The tradition of hoarding scraps seems to date back quite a ways.

I love the grass and cherry colors in this antique quilt.


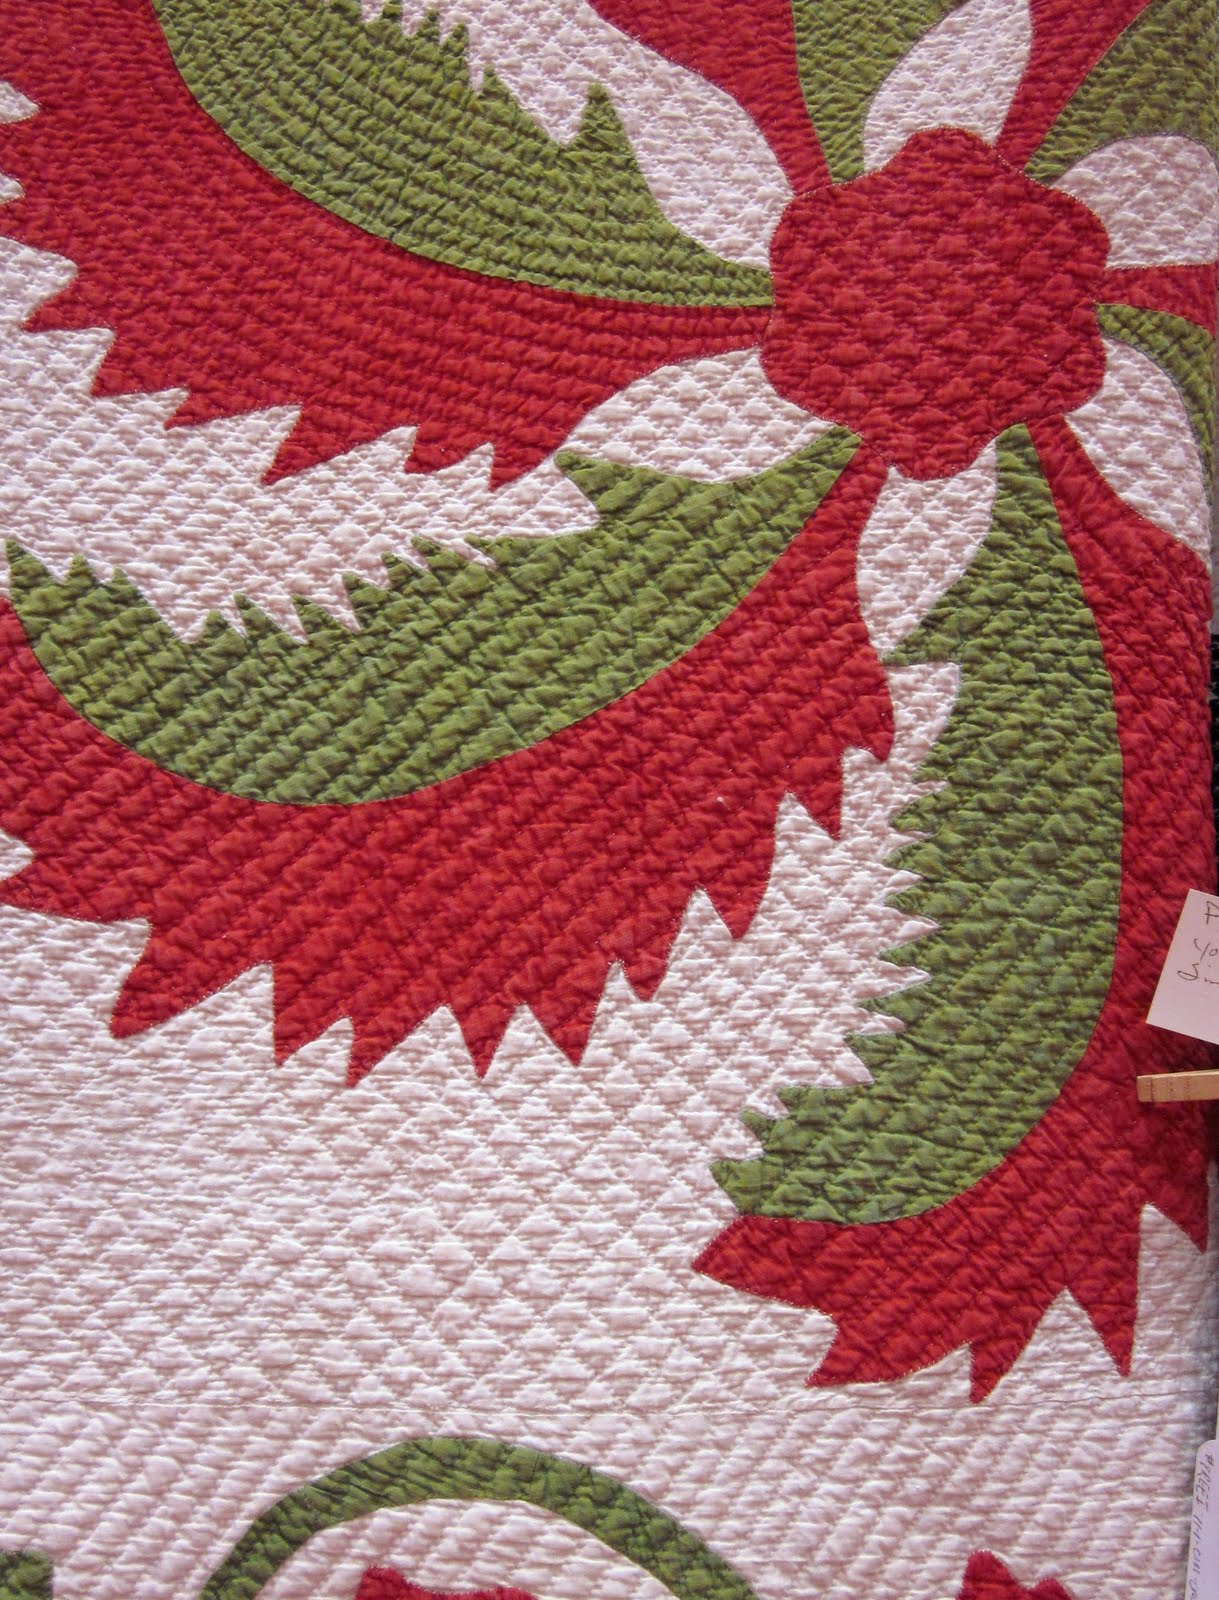
And the stunning applique work in this recently completed piece. 


That was the shot that almost got me kicked out of the show!  These folks taking pictures very seriously!

One last shot to share.  We came across this antique Singer sewing machine.  It is just like the machine that my Nana used when my mother was young.  Oh how we wish we had that machine back!


Our late afternoon Starbuck's run gave us enough pep to get home.  We came home with tired feet, full shopping bags, and big smiles! 

Oh, and I forgot to mention the fun shops we discovered.  Another blog post to follow with those!

Happy crafty,
e

Monday, April 11, 2011

Tuesday's Tute - Button Up Curtains

I have a sweet new nephew, and he needed a sweet curtain to go in his new room!  This design is so simple, easy to create, and very inexpensive!


Supplies Needed:
1 - 1x2" board, cut to the window width measurement plus 6"
      (prep the board by drilling 2 holes for your mounting screws)
Approximately 1 yd main fabric
Approximately 1 yd coordinating back fabric
2 buttons
thread
staple gun & staples

Step 1:  Measure the width of your window and the desired depth of the finished curtain.

Step 2.  Add 7" to your total width.  This will allow for a 1/2" seam allowance and an overlap of 3" on either side of the window.  This total is the length of your fabric cut.  Next, add 4.5" to your depth.  This will allow for a 1/2" seam allowance, plus 3.5" of fabric to wrap around your mounting board.  This total is the length of your fabric cut.

Step 3:  Use your width and length totals to cut both main and coordinating back fabrics to the desired size.

Step 4:  Mark the center of your fabric's width.  Cut a line 14" up along the fabric center.  This will create the split in the middle of your valance.


Step 5:  Pin fabric with right sides together.  Stich around the sides, bottom, and split of the valance, using a 1/2" seam allowance.


Step 6:  Trim excess fabric from the corners, and turn the valance right side out.  Use a turning tool to push the corners out for nice crisp edges.  Press all seams.

Step 7:  Pull back the bottom corners of the split.  Mark buttom placement.  And stitch buttons in place.


Step 8:  Stitch button holes in place.

Hint:  After stitching button holes in place, use a seam ripper to gently open the interior of the hole.  Then, use a small pair of scissors to carefully cut the remainder of the hold and trim excess threads.  Take care not to snip your stitching.


Step 9:   Wrap the top raw edge of your valance around the mounting board.  Use a staple gun to secure in place. 

Step 10:  Mount you valance on the wall by inserting screws through your mounting board, on the underside of your valance. 


Now enjoy your beautiful one-of-a-kind window treatment!

Happy crafty!
e

Saturday, April 9, 2011

Fabric Sale!

It's time to fuel the fabric addiction!  The lovely ladies over at Marie Madeline Studio have marked all of their fabrics down 20% this week!  Who can resist colors like these?

Mix.n.match.2

Around here I'm preparing to kidnap my hard-working mom for a girls' day.  We're headed to Cincinnati tomorrow for the International Quilt Festival!

I promise to bring back lots of great pictures, and some new ideas to share.

Enjoy your weekend!
e

Wednesday, April 6, 2011

Getting Started

I am continually amazed by the number of people I meet who are learning to sew, or who are newly self-taught.  Some of my first memories are of watching my mom make dresses for me.  She would let me sit and play in her fabric scraps, pretending to "sew", while she made beautiful custom dresses for me.  Gradually, she taught me to cut and measure fabric.  The first project that I can remember completing was a pillow for my Grandma Lois (the Lois in LoisPearl).  In fact, when I was a teenager and she was sick in the hospital, that pillow went along to keep her company.

You see, I take for granted that I truly grew up around a sewing machine.  Terms like, "backstitch", "selvage", "bias", and "seam allowance" have just about always been a part of my vocabulary.  Therefore, I have the utmost respect for those ambitious folks who are just learning to sew.  I've been on the lookout for a beginners sewing reference that I could recommend to friends, and today I found it!  The best part....IT'S FREE!

The folks at Sew Daily have put together Sewing Basics, and ebook available for FREE download. 

They begin by walking you through the items you'll need to keep on hand in your sewing kit, provide a glossary of basic sewing terms, and have a beginners guide to reading patterns.  It's concise, easy to read, and thorough.

They also have some great free patterns!

e

Tuesday, April 5, 2011

Tuesday's Tutorial - A Taggy

When E Lo was born, Miss Posh Petunia herself sent a taggy blanket our way.  Evy loved the feel of the snuggly blanket.  Ever since, taggies are one of my favorite gifts to give for new babies.  They are quick and simple to make, can be changed up a million different ways, and are a GREAT beginner project.

Begin with the following:
1 piece 16x20" woven cotton fabric
1 piece 16x20" minky
10 6" pieces of ribbon, pick a fun variety

Fold each piece of ribbon in half and press lightly, to form a crease in the middle.


Place ribbon edges along the outside perimeter of the right side of the minky fabric, with the creases on the inside.


Place cotton fabric on top of your minky and ribbons, making sure that the right sides are together.  Pin in place. 

Stitch around the outside perimeter using a straight stitch.  Leave a 5" gap in the seam on one side. 


After stitching along the outside of your blanket, trim the excess fabric from the corners.


Turn your blanket right side out.  Use a turning tool to be sure that the corners are nice and pointy.  Press so that the outside seams lay flat.  Use pins to close the 5" opening, taking care that the raw edges are folded in and not exposed.

Next, topstitch around the outside of your blanket.  This will close your opening that was used for turning.  You can use a simple straight stitch, or get creative.  Most sewing machines have many fun stitches to choose from these days.  Just be sure to try out your chosen decorative stitch on a scrap before using it on your blanket.

I chose a cute wavy stitch for my blankie.


Now it's time to wrap your finished handmade gift for a special little person!  These are also really fun doll blankets!


Happy stitching!
e

Saturday, April 2, 2011

Baby Steps

Well, it feels like a BIG step. 

I've been sewing my entire life, but have only been sewing somewhat professionally for the past two years.  Most of what I do is custom orders, handbags, kids clothing, and the occasional repair work or hem.  I've done a few craft shows, and plan to do a few more this year.  So what's next for Lois Pearl, is a question that I've been asking a lot lately.

I happened to strike up a conversation with the owner or Kool Kids Resale Kottage in Fishers, IN about a month ago.  I'd heard that she tends to carry a lot of Matilda Jane, and I wanted to see some of their outfits for myself.  Upon finding out about my little sewing business, she offered to take a look at some of my pieces.  Well, one thing led to another, and I'm so excited to say you can now find new one-of-a-kind Lois Pearl pieces at Kool Kids!  She has a handful of dresses and even some handbag options.


I'm criss-crossing my fingers that this could be a great new outlet for my goodies.  I love making one-of-a-kind handbags and dresses, and am really hoping that this new venture works out!  So, if you live in the area, do me a HUGE favor, and check out Lois Pearl at Kool Kids!

Kool Kids is located just south of 116th on Allisonville Road in Fishers, IN.

Happy crafty,
e